Showing posts with label Kiddie stuff. Show all posts

Tuesday, 26 November 2013

Applique T-shirt: Combine harvester

Yeh!!! A Guest Post!! Happy Happy Day!

I am thrilled to welcome one of my dearest friends - APARNA to the cacophony that is this blog. Aparna is in many ways the saner version of me... but when it comes to crafts of all kinds, she's just as Kooky, and way more Crafty. She crochets, and makes cards, and appliques clothes, and paints and a whole lot of other stuff.
Now that I've her to do one post, I can hope for another soon... maybe she will even become a regular contributor *wink wink*. Well, while I dream, Do read on......

------------------------------------------------------------------------------------------------------------


Background:
I must admit that I have been procrastinating to put this on the blog as I distracted myself to a crazy jigsaw puzzle! A little late!!

This all started when I asked my son a question two months back. "What picture shall I put on your T-shirt for the school harvest party?" I thought after being aware of Halloween season(!) and watching 'Nightmare Before Christmas', in addition to playing some spooky online games which were not at all scary, he would answer something spooky too. No, he didn't say Jack (of Jack O Lantern). He didn't say scary skeleton. He didn't even say spider or spider webs (which he has been crazy about all year through). He did think of a 'witch with a broom'. But then came the final answer: COMBINE! HARVESTER! I was shocked with delight..O yes! It was a harvest party! And the season is called Autumn or Fall. Okay, so I pondered again on "how to" make my little boy's party shirt with a combine! and this is the result.


Materials:
  1. Plain T-shirt for the kid (I used an orange colored full sleeves)
  2. Construction paper or any paper for drawing the image
  3. Old fabric piece for combine applique
  4. Scissors
  5. Marker
  6. Black sewing thread
  7. Needle
  8. One small and one big button

Instructions:

  • First decide the size of the combine you want to make and where you want to place it. 
  • Then, draw/ sketch a combine on a construction paper or any other paper. Cut the outlines, except for the wheels part. (refer the paper cut-out in the picture). 
  • Copy the outlines from the paper cut-out to the fabric piece. (Make sure the fabric piece is washed and ironed.) 
  • Now carefully cut the fabric in the right shape. I used a safety pin at the centre to keep the fabric and paper cut-out  together. 
  • With a marker complete the picture by adding inside details. 
  • Now, place the fabric on the T-shirt and sew it with a black thread (so to match the marker!). Again, I used the safety pin for the fabric piece and T-shirt so it didn't move while I started to stitch. 
  • Once it is done with the needle and thread, it's time to stitch the buttons. The smaller one goes as the back wheel while the larger one becomes the front one. 
  • Stitch the button half over the combine and rest half outside below on the shirt. 
  • Decorate with glitter etc and as you wish! 


Happy Harvest!

** You can, of course, use the same method to make a t-shirt with any theme you like. :)

Saturday, 14 September 2013

Variation on the Itty Bitty dress


Having made the Itty Bitty Dress once, I thought I would make another one for Trisha, daughter of friends Gauri and Anshuman. I love this pattern. It's simple and clean looking; and easy for the parents to get onto the kid. But I was not sure that the rabbit-ear shoulder ties would work with all faces and in all materials.

Trisha is three plus, and older to Inika. So I had to be sure I cut the dress properly, as the pattern size was just right for her. Also, with her features, I was afraid that the tie-ups would distract from her expressive face. Now we wouldn't want that, would we???
So, I decided to experiment with the structure of the shoulder tie-ups and thin them down a bit. On a recent shopping expedition, I had seen a dress that had strappy tie-ups; and this provided me with the inspiration for Trisha's dress.

Here is Trisha modelling this dress.


Variations made:
  • The main difference was in the cutting of the bodice pieces. I cut the sides and neck as per the original instructions and pattern; but instead of following the pattern for the tie ups, I cut the top of the bodice straight across the straps.
  • I then trimmed the top of the bodice to form a smooth line. This was done for all four pieces. I then pinned the two front and two back pieces as usual.
  • I cut four strips of material 4 inches x 12 inches. Each was folded in half lengthwise; right sides together. I then sewed around three sides (both long and one narrow side) with a 1/4th inch allowance. I then turned out each strip and poked out the corners so I had 4 bands that were about an inch and a half wide.
  • Two bands were attached to the front bodice piece and two to the back piece like shown in this tutorial. (That was the only technique I took from this one; but plan to try the bodice for a niece soon.)

Finally I stitched around the edges, turned out the bodice piece and constructed the dress as usual. The skirt of the dress was cut, gathered and attached as per the instructions for the Itty-Bitty Dress. I had this satiny scarlet bias tape that I sewed over the waist to hide the joint while showing off the rich colour of the tape as well. it made for a lovely waist-band.

I was so thankful when the dress fit! The parents seem to be happy with the dress; and so does the little lady if the photo is anything to go by! :P


Now to try more stunts for more kiddies and not-so-kiddies!! :D

Saturday, 24 August 2013

Li'l Flowers on the Itty - Bitty Dress

I am at that age where a majority of my friends have kids. For some reason, I seem to be the 'Kooky Aunt' to more little girls than boys. Not that I'm complaining.... I find SO many more patterns to make pretty things for girls, than I do for boys.
Some time back, I decided to start making stuff for the lil ladies ... and basically because my skills are still restricted to making simple dresses; I started with the Absolutely Awesome Itty Bitty Dress by Rae. Rae's blog not only showcases the patterns she sells, but also has a bunch of free patterns that are quite easy to make and a few tutorials for the really green (like me).

At the time I started the list of dresses, Priya (close friend) was moving cities, and I was hoping to complete a dress for her daughter Inika before she left. I made the dress a tad larger, So no photos of it on the adorable model yet. :)


The itty bitty dress pattern can be found here. This pattern is meant for a newborn. A larger size for the same dress can be found here; which I used. I used a soft white cotton to line the inside of the bodice, and used a satin bias tape for the waist. It's a lovely rich colour, just a shade deeper than the teeny flowers on the material. The fabric itself is a pure cotton, soft to feel, and happy to play in.

I was originally planning to follow the patterns completely; but once I'd completed the dress, I thought that it didn't need bias tape on the hem. Especially so, since my bias tape was satin, and one loose stitch could have it drooping off and looking ugly. Also, I was kinda in love with the print on the fabric. :P

I have been promised photos of the dress being modelled by the  Lovely Miss Inika soon; and will upload them as soon as I get them. In the meanwhile, here is the dress again.


Monday, 12 August 2013

Embroidery on Kiddie Clothes - 1

Before I got my sewing - machine, I was dabbling in painting and embroidering on clothes. Although I've done bits and pieces for myself, the most satisfying experience is when I embroider kiddie clothes. I think it has something to do with the fact that each garment is so itty-bitty, and gets done quickly! :)

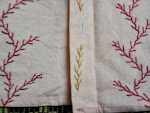
One of the most awesome stitches to do on tiny items is the Open Feather Stitch. It's simple, rapidly completed, and yet manages to look detailed and stylish. (OK, so stylish doesn't apply that well with a kiddie top. But it does look stylish. More on that later). The important thing is to choose a good design, and the right colours. A lovely tutorial to using the feather stitch is here. I have been using this stitch for over a decade and a half now; but for a beginner, Sarah provides lucid and clear instructions. Initially, it can be a tad difficult to get the side branches to look even; so I would recommend penciling in lines to ensure that it looks good.
For the kiddie items, I like to go with a basic tree / bush / coral reef pattern. The design is uni-sex, and that is a tremendous help here in India, where it's illegal to identify the sex of an unborn child. And since I certainly lack this little thing called drive-to-work-rapidly, I need to bet started on stuff before babies arrive! :P

Now to the specifics! For the first piece that had sleeves, the branches for each tree were more delicate, and a li'l branch went onto each of the sleeves. The shirt was a pale green, and so I chose my favorite red and purple embroidery threads.
PhotoPhoto
The other shirt was a much brighter orange, and so I decided to use red and mustard threads to make it look fun. This was also a larger size, and so the trees got a bit bigger, with branches spaced out a tad bit more. It's awesome how a teeny bit more space between stitches can change the way the design feels. This shirt had a little space between buttons, and so I decided to add a couple of mustard branches between buttonholes - two reasons.... it looked a tad special; and I finished the length of mustard thread I had cut!

PhotoPhoto
Two hours of T.V and embroidery, and these were ready to roll. More stitches to be discussed soon!