Tuesday 26 November 2013

Applique T-shirt: Combine harvester

Yeh!!! A Guest Post!! Happy Happy Day!

I am thrilled to welcome one of my dearest friends - APARNA to the cacophony that is this blog. Aparna is in many ways the saner version of me... but when it comes to crafts of all kinds, she's just as Kooky, and way more Crafty. She crochets, and makes cards, and appliques clothes, and paints and a whole lot of other stuff.
Now that I've her to do one post, I can hope for another soon... maybe she will even become a regular contributor *wink wink*. Well, while I dream, Do read on......

------------------------------------------------------------------------------------------------------------


Background:
I must admit that I have been procrastinating to put this on the blog as I distracted myself to a crazy jigsaw puzzle! A little late!!

This all started when I asked my son a question two months back. "What picture shall I put on your T-shirt for the school harvest party?" I thought after being aware of Halloween season(!) and watching 'Nightmare Before Christmas', in addition to playing some spooky online games which were not at all scary, he would answer something spooky too. No, he didn't say Jack (of Jack O Lantern). He didn't say scary skeleton. He didn't even say spider or spider webs (which he has been crazy about all year through). He did think of a 'witch with a broom'. But then came the final answer: COMBINE! HARVESTER! I was shocked with delight..O yes! It was a harvest party! And the season is called Autumn or Fall. Okay, so I pondered again on "how to" make my little boy's party shirt with a combine! and this is the result.


Materials:
  1. Plain T-shirt for the kid (I used an orange colored full sleeves)
  2. Construction paper or any paper for drawing the image
  3. Old fabric piece for combine applique
  4. Scissors
  5. Marker
  6. Black sewing thread
  7. Needle
  8. One small and one big button

Instructions:

  • First decide the size of the combine you want to make and where you want to place it. 
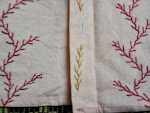
  • Then, draw/ sketch a combine on a construction paper or any other paper. Cut the outlines, except for the wheels part. (refer the paper cut-out in the picture). 
  • Copy the outlines from the paper cut-out to the fabric piece. (Make sure the fabric piece is washed and ironed.) 
  • Now carefully cut the fabric in the right shape. I used a safety pin at the centre to keep the fabric and paper cut-out  together. 
  • With a marker complete the picture by adding inside details. 
  • Now, place the fabric on the T-shirt and sew it with a black thread (so to match the marker!). Again, I used the safety pin for the fabric piece and T-shirt so it didn't move while I started to stitch. 
  • Once it is done with the needle and thread, it's time to stitch the buttons. The smaller one goes as the back wheel while the larger one becomes the front one. 
  • Stitch the button half over the combine and rest half outside below on the shirt. 
  • Decorate with glitter etc and as you wish! 


Happy Harvest!

** You can, of course, use the same method to make a t-shirt with any theme you like. :)

Wednesday 2 October 2013

Healthy-ish Breakfast Muffins


Breakfast is a pain to make! I mean, I'm barely awake, and I have to take the ginormous effort of persuading myself to get out of bed and keep my eyes open, and all that. Instead of applauding these achievements, I then have to do stuff like open windows, clear stuff that can be stepped on, make tea.... before you ask, no I have neither kids nor second-childhood kids in my house... it's just that I'm sloppy and tremendously lazy.... and the occasional depressive symptoms SO do not help!


But, coming back to the issue at hand, making breakfast is a pain.... and packaged stuff is either unhealthy or really expensive. And there is really a limit to how many days in a row one person can eat cornflakes / muesli - especially when Pune starts getting chilly mornings. So I was ecstatic when I came across the notion that some muffins last for a good bunch of days when frozen. I'm sure I can manage to make stuff a couple of times a week if it means I get to eat tasty, nutritious food every morning with no effort on most days! Thus started the hunt for such a recipe.

Success happened when I reached www.food.com and found these Awesome Oats Muffins. They were easy, looked yummy and seemed rather healthy. Of course, I had to try stunts. Partly because I do not have malt-flavored oats.... partly because... well, it's me. So, here's my variation....


 Yum..... Yum..... Yum....


Oats and Dry-fruit Muffins

You Need:
1 cup quick cooking oats
2/3 cup whole wheat flour
1/3 cup all purpose flour / maida
3/4 cup milk
1/2 cup organic brown sugar
1 egg
4 tablespoons oil (any vegetable oil)
3 teaspoons baking powder
1 teaspoon vanilla extract (optional)
1/2 - 3/4 cup dry fruit bits - I used dried apricots and dark raisins; but nuts like cashew, almonds and pistachios will also taste good; as will any kind of raisins, dates, or other sweet and sticky bits.


How to make them with one eye open:
  • Slightly beat the egg.
  • Add the oil, then the sugar, then the milk.
  • If using vanilla extract, add. It provides a lovely bake-y smell (or fragrance) to the proceedings.
  • Add the oats, incorporate.
  • Add the flours and the baking powder just till incorporated.
  • Add the dry fruit bits, distribute them across the mixture. If the mixture feels too dry, add a little milk till it feels moist enough. At this point it's lumpy but dropping consistency.
  • In the meanwhile, heat oven to 200 C.
  • Spoon the mixture - which looks rather lumpy - into a muffin pan (I use a large muffin tray with 6 slots). 
  • Bung into the oven, bake for between 20 - 25 mins till a toothpick / skewer comes out clean. 

Random, but relevant points (for when you are slightly more awake):

  • If you think your dry fruit is a tad too dry, bung the bits in 1/4 cup of the milk for a couple of hours (or overnight if u put it in the fridge). A secondary benefit of doing this is that the milk picks up the flavors from the dry fruit (and turns the color of chocolate milk) and when you add this to the mix, it flavors the whole muffin a subtle, sweet flavor.
  • If you want the muffin to look purty, keep a few pieces of the dry fruit aside, and then place / scatter them on top of the batter once it's in the molds. They come out looking adorable.
  • **Very important point **- I am a dork that is fine with stuff not tasting particularly sweet, so the brown sugar works fine for me. If you like a bit of sweetness, use white sugar, or equal parts (1/4 cups) of brown and white sugar. 
Once they come out, pick the one you want to eat, and then pop the rest in a freezer safe box, and freeze them. A week's worth of healthy breakfast ready for you to start your day with!


Now go make a muffin, and join me for a cuppa! :)


Saturday 14 September 2013

Variation on the Itty Bitty dress


Having made the Itty Bitty Dress once, I thought I would make another one for Trisha, daughter of friends Gauri and Anshuman. I love this pattern. It's simple and clean looking; and easy for the parents to get onto the kid. But I was not sure that the rabbit-ear shoulder ties would work with all faces and in all materials.

Trisha is three plus, and older to Inika. So I had to be sure I cut the dress properly, as the pattern size was just right for her. Also, with her features, I was afraid that the tie-ups would distract from her expressive face. Now we wouldn't want that, would we???
So, I decided to experiment with the structure of the shoulder tie-ups and thin them down a bit. On a recent shopping expedition, I had seen a dress that had strappy tie-ups; and this provided me with the inspiration for Trisha's dress.

Here is Trisha modelling this dress.


Variations made:
  • The main difference was in the cutting of the bodice pieces. I cut the sides and neck as per the original instructions and pattern; but instead of following the pattern for the tie ups, I cut the top of the bodice straight across the straps.
  • I then trimmed the top of the bodice to form a smooth line. This was done for all four pieces. I then pinned the two front and two back pieces as usual.
  • I cut four strips of material 4 inches x 12 inches. Each was folded in half lengthwise; right sides together. I then sewed around three sides (both long and one narrow side) with a 1/4th inch allowance. I then turned out each strip and poked out the corners so I had 4 bands that were about an inch and a half wide.
  • Two bands were attached to the front bodice piece and two to the back piece like shown in this tutorial. (That was the only technique I took from this one; but plan to try the bodice for a niece soon.)

Finally I stitched around the edges, turned out the bodice piece and constructed the dress as usual. The skirt of the dress was cut, gathered and attached as per the instructions for the Itty-Bitty Dress. I had this satiny scarlet bias tape that I sewed over the waist to hide the joint while showing off the rich colour of the tape as well. it made for a lovely waist-band.

I was so thankful when the dress fit! The parents seem to be happy with the dress; and so does the little lady if the photo is anything to go by! :P


Now to try more stunts for more kiddies and not-so-kiddies!! :D

Saturday 24 August 2013

Li'l Flowers on the Itty - Bitty Dress

I am at that age where a majority of my friends have kids. For some reason, I seem to be the 'Kooky Aunt' to more little girls than boys. Not that I'm complaining.... I find SO many more patterns to make pretty things for girls, than I do for boys.
Some time back, I decided to start making stuff for the lil ladies ... and basically because my skills are still restricted to making simple dresses; I started with the Absolutely Awesome Itty Bitty Dress by Rae. Rae's blog not only showcases the patterns she sells, but also has a bunch of free patterns that are quite easy to make and a few tutorials for the really green (like me).

At the time I started the list of dresses, Priya (close friend) was moving cities, and I was hoping to complete a dress for her daughter Inika before she left. I made the dress a tad larger, So no photos of it on the adorable model yet. :)


The itty bitty dress pattern can be found here. This pattern is meant for a newborn. A larger size for the same dress can be found here; which I used. I used a soft white cotton to line the inside of the bodice, and used a satin bias tape for the waist. It's a lovely rich colour, just a shade deeper than the teeny flowers on the material. The fabric itself is a pure cotton, soft to feel, and happy to play in.

I was originally planning to follow the patterns completely; but once I'd completed the dress, I thought that it didn't need bias tape on the hem. Especially so, since my bias tape was satin, and one loose stitch could have it drooping off and looking ugly. Also, I was kinda in love with the print on the fabric. :P

I have been promised photos of the dress being modelled by the  Lovely Miss Inika soon; and will upload them as soon as I get them. In the meanwhile, here is the dress again.


Sunday 18 August 2013

Latest Sewing Acquisition: Pinking Shears!

I had a B'day recently. My 31st year on the planet reached it's conclusion with both me and the planet still able to bear the other. And thus, it was a day of celebration. I received a bunch of stuff.... a phone from the husband (though that one came a couple of weeks in advance), material that will soon become a kurta (design identified... courage to be gathered!), heart-shaped and more regularly usable cupcake moulds and the such. But one friend - the very intelligent Reema from http://cameralore.wordpress.com decided to ask me straight out what I wanted. After some dilly-dallying, I realised that I did want something - A pair of Pinking Shears for cloth!

Now, the couple of times that I had tried to look for them, I had found sad, not really durable ones. So I told her to get me a pair if she found a good one. And she did! This pair is really good, and I am hoping to get plenty of use out of it. The insides of my home made clothes will look so much better now! (This photo has been taken with the brand new phone :P)


Prompt use has been made, and with great joy and happiness. More on that later.

Monday 12 August 2013

Embroidery on Kiddie Clothes - 1

Before I got my sewing - machine, I was dabbling in painting and embroidering on clothes. Although I've done bits and pieces for myself, the most satisfying experience is when I embroider kiddie clothes. I think it has something to do with the fact that each garment is so itty-bitty, and gets done quickly! :)

One of the most awesome stitches to do on tiny items is the Open Feather Stitch. It's simple, rapidly completed, and yet manages to look detailed and stylish. (OK, so stylish doesn't apply that well with a kiddie top. But it does look stylish. More on that later). The important thing is to choose a good design, and the right colours. A lovely tutorial to using the feather stitch is here. I have been using this stitch for over a decade and a half now; but for a beginner, Sarah provides lucid and clear instructions. Initially, it can be a tad difficult to get the side branches to look even; so I would recommend penciling in lines to ensure that it looks good.
For the kiddie items, I like to go with a basic tree / bush / coral reef pattern. The design is uni-sex, and that is a tremendous help here in India, where it's illegal to identify the sex of an unborn child. And since I certainly lack this little thing called drive-to-work-rapidly, I need to bet started on stuff before babies arrive! :P

Now to the specifics! For the first piece that had sleeves, the branches for each tree were more delicate, and a li'l branch went onto each of the sleeves. The shirt was a pale green, and so I chose my favorite red and purple embroidery threads.
PhotoPhoto
The other shirt was a much brighter orange, and so I decided to use red and mustard threads to make it look fun. This was also a larger size, and so the trees got a bit bigger, with branches spaced out a tad bit more. It's awesome how a teeny bit more space between stitches can change the way the design feels. This shirt had a little space between buttons, and so I decided to add a couple of mustard branches between buttonholes - two reasons.... it looked a tad special; and I finished the length of mustard thread I had cut!

PhotoPhoto
Two hours of T.V and embroidery, and these were ready to roll. More stitches to be discussed soon!

Saturday 27 July 2013

Painting a Rug

Immediately post my wedding I has shuttling between cities, getting adjusted to running the house, and doing a whole lot of things that were either new (and needed getting used to) or boring (and needed getting adjusted to). This ensured that my crafting had come to a complete stop. Life was awesome, but was missing a certain cheap-thrills / glee element. So when I took a break to get my messed up health back on track, I decided to ensure that my previously sporadic crafting would now become a regular part of life.

One of the first plans I made was to beautify the everyday use objects that were in desperate need of pretti-fication. When I mentioned this to Shri, his response was "They do??" (Amazingly awesome husband though Shri is; he can live with butt-ugly stuff and never notice). So I started. The first item on my list was a boring, striped cotton area rug. Although eminently useful and colorful, it lacked what I like to call either 'character' or 'pizzazz'.

The colors on the rug kinda made me think of the Savannah (or the fact that I was watching a series on animal life in Africa did). So I decided to paint some animals silhouettes on it, the way they are seen against the evening  / morning light in the documentaries. Of,course, the fact that this meant using a single color was an important deciding factor. :P

This is kinda what inspired me


Once I had decided to do animal silhouettes, I had to choose animals. And I quickly realized that the very bright colors on the rug would dampen the impact that most animal silhouettes would have. So I needed a very distinctive shape, and found that the giraffe best suited my needs. I cut out a giraffe shape in card-paper, and then used it to trace outlines onto the rug in chalk. This helped me decide on the placement, and also ensured that I would not have to deal with a stencil while painting. I was worried that paint may bleed off the edges of a paper / card stencil onto the surrounding areas; particularly since the rug was a very absorbent cotton.

Used a nice brown shade in fabric colors, and applied about three coats for each silhouette. This was the first one.

Photo

Once I was sure I liked what I was making, I added another four behind the first one to complete the side.
Photo

Originally, I had thought of painting on only one side of the rug. But with one side complete, I realized that I would have to paint the other side as well! So more paint was bought, and more giraffe's appeared on the other end of the rug. End result - awesome looking rug that is still looking good and making our living room look cool 2 years later. :)
Photo

Sunday 21 July 2013

Butterfly's on a Clock


Recently (OK, not so recently) I had ordered a mirror finish clock off a shopping website. It's a simple round clock face, with a few butterfly's flying out of it. It fit in perfectly with the minimalist/classic/natural theme of my attempts at decor. The only problem was, when it got delivered, it had a crack. Right in the middle, and eminently noticeable, thanks to the clear glassy surface.
Photo

The website I had ordered from was nice enough to try and replace it, failing which they provided me with a generous voucher which I have since used to buy some awesome dinnerware. But the clock still sat in a corner, since we had no idea what to do with it (and I HATE throwing stuff out). Then the other day I suddenly remembered that Aparna had sent me some adorable butterfly cutouts. So They were dug out to see if any would cover the crack properly. And what do you know?? One did!

Photo


The clock had come with a number of double sided sticky dots. Using one, I managed to secure the butterfly flat to the clock-face. Thus "repaired", the clock promptly went up on the wall. I decided to add a couple more of Aparna's butterfly's along with the mirror finish ones just so there's some color; and voila! Awesome time-telling wall decor was in action.


Monday 1 July 2013

Flared Cotton Top


My fascination with clothes continues. As does my desire to try stunts. The biggest issue I had with the previously made Kaftan Top was that it bellowed around the belly. Now I wanted to make something that was simple, but comfortable and flattering. So a basic flared top like the one shown here was the chosen victim.

The original tutorial was written with jersey fabric in mind, but I (the one with abundant foolhardiness) decided to experiment with a soft cotton instead. 'Why, Why when you are just learning?' you may ask. Well, for one, I love using cotton and for another, finding jersey or other soft knits in my area in a pain in the brain! The question of the day now was: Would the flared hem fall as gracefully in cotton, or would it stick out comically?

I am glad to say that it sits reasonably well. It's a li'l flared and fun, and thankfully, not comical.

PhotoI chose to use some prudence, and cut the sleeves without any flare. With my not-at-all-slim frame, I really can't carry off floppy sleeves; particularly in cotton. This gave the whole thing a rather simplistic look, but I like that.


Photo

The one mistake-ish I made, is that I tried to fold over the edges and stitch for the armholes, neck and hem. While this works perfectly for the armholes and the hem, it's not the best idea for a curved neckline! Cotton does not feel happy about being folded and stitched over... so I got a really narrow hem (and may just have skewed the neckline a bit at that).


 At this point I tried the top on, and it kinda floated around me a little funnily.


To ensure that it fit, I put in darts at the back. This image and tutorial supplied by Melanie Rose gives an idea of the various ways to use darts in different locations. I put in two darts in the back (the orange markings for the back in the diagram), and suddenly the thing looked just purty!


And so, the top was ready for use. I did a library run in it, and it felt really comfy and felt good. Happy days!


Photo

Wednesday 26 June 2013

Simple Kaftan Top


When I study, I crave shopping for clothes.
How reading about the theories and applications of Psychology connects to the desire to go forth and buy items of clothing is, and probably shall always remain a mystery to my simple mind. But there does exist a connection. So when I started preparing for my PhD., there came that inane desire to go into a shop filled with clothes and get confused. May I point out here, I presently have neither the patience nor the energy required to try out a gazillion clothes to find something that fit me and looked kinda-sorta pretty at the same time!

A disaster in the making you say? The husband to deal with an academically saturated and shopping frustrated monster? May have been.... Except, this time I was prepared with a healthier solution! For some time now, I have been collecting sewing patterns and techniques to try out. So I decided to pull out cloth stowed away, and make a few muslins and see if making clothes was a real option (for the uninitiated, a muslin is a trial item made with simpler / less expensive material before making something with a really expensive material). A little sewing every couple of days has kept me mostly out of the shops for a good 2.5 months now. :)

Kaftan top's seem very 'in' apparently, so i decided to try making one. I followed this really simple pattern, but cut the material to a little below Hip - length. Once I'd made the basic top, I decided to try my hand at shirring as well.
Photo


Photo


That is where I learnt a VERY important lesson: Shirring gathers the cloth in a LOT. So I snipped the elastic thread in a little over half the back. But thanks to the gathers in the front, the back actually fits pretty decently too.


The arm - holes were just right, and the fit is very comfortable. I also like to pretend that my waist feels flattered (no no, don't disillusion me). But the most fun is the wide boat neck. The next photo show's off the neck 
Photo


(The mania - like expression is not real. Shri demanded I 'keep my eyes open'. This is what happened!)


The next time, I'm going to add some width to the front piece, and let the extra material form a slight cowl at the neck. It'll feel more comfy; and may even look more classy!
This one's pretty decent for a simple day out though. I wore it out just yesterday, and it was comfortable, and with the right jewelry, looked quite stylish, I thought. :)


Tuesday 18 June 2013

Gingerbread Cake for a Monsoon B'Day

B'day season in our home is the Monsoon. Shri's birthday coincides with the beginning of the monsoon, and so it is usually an indoors event. When I say event, I use the word very loosely. I happen to be a pro at making up crazy plans, and managing shindigs. But I also happen to be married to an individual who is emotionally allergic to being celebrated.


Q: So how does one celebrate the birthday of someone who likes to pretend that his birthday doesn't exist? 
A: Do something he doesn't want to ignore! (In this case, it's make him something he'd like to eat.)


No party, no 'Birthday cake' needed. So, I kinda cheated. I took the recipe for the Gingerbread Cake from www.joyofbaking.com and made cupcakes out of it. I didn't use liners, since I planned to make the glaze suggested, and i wanted nice drips down the sides. I figured a man who loved ginger cookies would not be able to question the making of a gingerbread cake. And was I right!!! Once he smelt the  batter, there was even excitement about the proceedings!

This cake is both fragrant and scrumptious, and light as air. It melts in the mouth, and can be eaten both warm and cold (I would recommend warm if made on a cold day). the Lemon Glaze looks adorable; and adds a lovely freshness to the cake. Oh, and yes, easy to make :)
Variation used: I added a handful of cut up candied ginger to the batter just before pouring into a silicon cupcake mould. Worked better than I'd hoped :)

And yes, the flavors intensify the next day. So this is a cake that should be made a day or two before eating time. The only warning I have is to HIDE it away, or it will disappear.


Photo
Photo

The drips on the cupcakes (the Lemon Glaze) look SO adorable, I saw no need for any more decoration. Also, This way they look simple and elegant. :) 


The speed at which these were polished off, i'm guessing it was a Very Happy B'day, Shri! Muah!
Photo


Thursday 13 June 2013

Lets Craft Small-er (Jeans)

Jeans. One of the most comfortable pieces of clothing. You can buy 'em and wear 'em right out of the shop - unless you are petite, curvy and not really in shape, like me. Then there's always something that needs to be fixed. So when it was time to buy a new pair, I was not all sunshine in spite of the promise of a shopping trip (still, was mostly sunshine). Once I found a lovely pair of light blue jeans, the positive effects of retail therapy kicked in. Yeh! Once the initial euphoria wore off, I realized that there was no wearing the pretty new pair of jeans till the length was altered (it had a good many extra inches in the leg). Also, while the waist fit me really well, I could do with a little more tailoring to ensure it stayed fitted when sitting down.

And then I found two tips that made my life all happy. The first came from here. This method requires one to fold the leg in, and stitch the original hem bit to the point which is one's required length. The flap of extra material can be either cut away, or hemmed up. I could definitely do that at home!! And so, I did. Because the original hem was retained, and none of my stitching was at all visible, all the detailing was just the same.

This is how much I needed to fold the jeans.....
Photo

This is how they looked when finished. This technique would work much better with a softer material, of course.
Photo

Now to make the waist fit.
This second tip was even simpler. This idea is genius, it is!! And I found it here. A tad bit of elastic, thread that blends in with the denim and the zig-zag setting on the sewing machine. I haven't done this, but I hope to try it on a low - waist pair of jeans soon.

All that's left to do is wear my newly shortened jeans and go meet some friends. :)


Sunday 9 June 2013

Simple Sweetness


So, first thing that Gauri makes! May this be noted as the ONE time I fall back on tradition, and start a new venture (this here blog) with something sweet. .... Or at least something that is a necessary ingredient in making a whole lot of sweet baked stuff. And to honor the lazy in me, this is something of absolute, elegant simplicity.
Enough build up. I give you .... Vanilla Extract!

Photo

Exceedingly easy to make... take a nice and clean bottle, add plain vodka, slit a few vanilla pods and bung them right in. Then let it sit on a shelf for a few months, and bingo! Vanilla Extract, ready for use. I found this technique on a blog hop for recipes that led me here.

And yes, even with a simple bottle, it looks fabulous. Which makes it the perfect pretty little thing to keep on a shelf in the kitchen. Dr on the dining table, so long as it doesn't come into direct sunlight. This is one that I am making for a friend, which is about two weeks old. I'm almost sad mine doesn't look as purty anymore; but on the flip side, cookies!! :)

PhotoPhoto

Qualifies as an evolving piece of art, no?

Sunday 24 February 2013

Ancient Beginings

So, I craft. I sew, and bake, and make. 

It's a family thing on the maternal side, I'd say.... but far too many of the ladies of the parental and grand-parental generations of our time are known to have made sweaters, shawls  clothes and other sundry items of love and utility. The Maharashtrians even have a tradition of displaying their daughters' ability to craft stuff at a young lady's wedding. Thusly, it would seem that another reason is required to explain away my almost obsessive need to craft.
I am now going to blame a little thing called childhood. I spent about half of mine being sick, and the other half having my tastes and likes molded by lovely people who worked in a museum (where also my said maternal parent did). Now that in itself would not be significant, but it needs to be said that all these lovely people were trained to seek the unique, classic and folksy - a trait that they encouraged in all potential minds that they could influence. Compound this with the plethora of craft and art workshops that they hosted to entice children to the museum (workshops that yours truly was always plonked in) and there stands the correct mixture to create a Kooky Crafter.

OK OK, so the kooky is just me. But this blog is about the crafts, and I claim that the said history lesson in the life of this oddball is still a valid first post. 

Now that the story is told and the relevant persons have been blamed, let us proceed with the tales of crafting! I will try to post pictures of the stuff I make, and the inspirations for the said items. Where available, links shall be provided to the original blogger who posted the recipe / pattern / inspiration. Where I have used my own head - and these will be fewer by far - I will try to provide a coherent tutorial for whomsoever is interested. If you happen to land of some such grueling post, just ignore the blabber, and gimme feedback on the item. :)

Somebody asked me if I will sell stuff that i make. While I do torture people I know with it, I cannot imagine anyone volunteering to be tortured thusly. But if someone does, drop me a line, and I will try my very best to help.

Toodles for now!