Showing posts with label Sewing. Show all posts

Saturday, 14 September 2013

Variation on the Itty Bitty dress


Having made the Itty Bitty Dress once, I thought I would make another one for Trisha, daughter of friends Gauri and Anshuman. I love this pattern. It's simple and clean looking; and easy for the parents to get onto the kid. But I was not sure that the rabbit-ear shoulder ties would work with all faces and in all materials.

Trisha is three plus, and older to Inika. So I had to be sure I cut the dress properly, as the pattern size was just right for her. Also, with her features, I was afraid that the tie-ups would distract from her expressive face. Now we wouldn't want that, would we???
So, I decided to experiment with the structure of the shoulder tie-ups and thin them down a bit. On a recent shopping expedition, I had seen a dress that had strappy tie-ups; and this provided me with the inspiration for Trisha's dress.

Here is Trisha modelling this dress.


Variations made:
  • The main difference was in the cutting of the bodice pieces. I cut the sides and neck as per the original instructions and pattern; but instead of following the pattern for the tie ups, I cut the top of the bodice straight across the straps.
  • I then trimmed the top of the bodice to form a smooth line. This was done for all four pieces. I then pinned the two front and two back pieces as usual.
  • I cut four strips of material 4 inches x 12 inches. Each was folded in half lengthwise; right sides together. I then sewed around three sides (both long and one narrow side) with a 1/4th inch allowance. I then turned out each strip and poked out the corners so I had 4 bands that were about an inch and a half wide.
  • Two bands were attached to the front bodice piece and two to the back piece like shown in this tutorial. (That was the only technique I took from this one; but plan to try the bodice for a niece soon.)

Finally I stitched around the edges, turned out the bodice piece and constructed the dress as usual. The skirt of the dress was cut, gathered and attached as per the instructions for the Itty-Bitty Dress. I had this satiny scarlet bias tape that I sewed over the waist to hide the joint while showing off the rich colour of the tape as well. it made for a lovely waist-band.

I was so thankful when the dress fit! The parents seem to be happy with the dress; and so does the little lady if the photo is anything to go by! :P


Now to try more stunts for more kiddies and not-so-kiddies!! :D

Saturday, 24 August 2013

Li'l Flowers on the Itty - Bitty Dress

I am at that age where a majority of my friends have kids. For some reason, I seem to be the 'Kooky Aunt' to more little girls than boys. Not that I'm complaining.... I find SO many more patterns to make pretty things for girls, than I do for boys.
Some time back, I decided to start making stuff for the lil ladies ... and basically because my skills are still restricted to making simple dresses; I started with the Absolutely Awesome Itty Bitty Dress by Rae. Rae's blog not only showcases the patterns she sells, but also has a bunch of free patterns that are quite easy to make and a few tutorials for the really green (like me).

At the time I started the list of dresses, Priya (close friend) was moving cities, and I was hoping to complete a dress for her daughter Inika before she left. I made the dress a tad larger, So no photos of it on the adorable model yet. :)


The itty bitty dress pattern can be found here. This pattern is meant for a newborn. A larger size for the same dress can be found here; which I used. I used a soft white cotton to line the inside of the bodice, and used a satin bias tape for the waist. It's a lovely rich colour, just a shade deeper than the teeny flowers on the material. The fabric itself is a pure cotton, soft to feel, and happy to play in.

I was originally planning to follow the patterns completely; but once I'd completed the dress, I thought that it didn't need bias tape on the hem. Especially so, since my bias tape was satin, and one loose stitch could have it drooping off and looking ugly. Also, I was kinda in love with the print on the fabric. :P

I have been promised photos of the dress being modelled by the  Lovely Miss Inika soon; and will upload them as soon as I get them. In the meanwhile, here is the dress again.


Sunday, 18 August 2013

Latest Sewing Acquisition: Pinking Shears!

I had a B'day recently. My 31st year on the planet reached it's conclusion with both me and the planet still able to bear the other. And thus, it was a day of celebration. I received a bunch of stuff.... a phone from the husband (though that one came a couple of weeks in advance), material that will soon become a kurta (design identified... courage to be gathered!), heart-shaped and more regularly usable cupcake moulds and the such. But one friend - the very intelligent Reema from http://cameralore.wordpress.com decided to ask me straight out what I wanted. After some dilly-dallying, I realised that I did want something - A pair of Pinking Shears for cloth!

Now, the couple of times that I had tried to look for them, I had found sad, not really durable ones. So I told her to get me a pair if she found a good one. And she did! This pair is really good, and I am hoping to get plenty of use out of it. The insides of my home made clothes will look so much better now! (This photo has been taken with the brand new phone :P)


Prompt use has been made, and with great joy and happiness. More on that later.

Monday, 1 July 2013

Flared Cotton Top


My fascination with clothes continues. As does my desire to try stunts. The biggest issue I had with the previously made Kaftan Top was that it bellowed around the belly. Now I wanted to make something that was simple, but comfortable and flattering. So a basic flared top like the one shown here was the chosen victim.

The original tutorial was written with jersey fabric in mind, but I (the one with abundant foolhardiness) decided to experiment with a soft cotton instead. 'Why, Why when you are just learning?' you may ask. Well, for one, I love using cotton and for another, finding jersey or other soft knits in my area in a pain in the brain! The question of the day now was: Would the flared hem fall as gracefully in cotton, or would it stick out comically?

I am glad to say that it sits reasonably well. It's a li'l flared and fun, and thankfully, not comical.

PhotoI chose to use some prudence, and cut the sleeves without any flare. With my not-at-all-slim frame, I really can't carry off floppy sleeves; particularly in cotton. This gave the whole thing a rather simplistic look, but I like that.


Photo

The one mistake-ish I made, is that I tried to fold over the edges and stitch for the armholes, neck and hem. While this works perfectly for the armholes and the hem, it's not the best idea for a curved neckline! Cotton does not feel happy about being folded and stitched over... so I got a really narrow hem (and may just have skewed the neckline a bit at that).


 At this point I tried the top on, and it kinda floated around me a little funnily.


To ensure that it fit, I put in darts at the back. This image and tutorial supplied by Melanie Rose gives an idea of the various ways to use darts in different locations. I put in two darts in the back (the orange markings for the back in the diagram), and suddenly the thing looked just purty!


And so, the top was ready for use. I did a library run in it, and it felt really comfy and felt good. Happy days!


Photo

Wednesday, 26 June 2013

Simple Kaftan Top


When I study, I crave shopping for clothes.
How reading about the theories and applications of Psychology connects to the desire to go forth and buy items of clothing is, and probably shall always remain a mystery to my simple mind. But there does exist a connection. So when I started preparing for my PhD., there came that inane desire to go into a shop filled with clothes and get confused. May I point out here, I presently have neither the patience nor the energy required to try out a gazillion clothes to find something that fit me and looked kinda-sorta pretty at the same time!

A disaster in the making you say? The husband to deal with an academically saturated and shopping frustrated monster? May have been.... Except, this time I was prepared with a healthier solution! For some time now, I have been collecting sewing patterns and techniques to try out. So I decided to pull out cloth stowed away, and make a few muslins and see if making clothes was a real option (for the uninitiated, a muslin is a trial item made with simpler / less expensive material before making something with a really expensive material). A little sewing every couple of days has kept me mostly out of the shops for a good 2.5 months now. :)

Kaftan top's seem very 'in' apparently, so i decided to try making one. I followed this really simple pattern, but cut the material to a little below Hip - length. Once I'd made the basic top, I decided to try my hand at shirring as well.
Photo


Photo


That is where I learnt a VERY important lesson: Shirring gathers the cloth in a LOT. So I snipped the elastic thread in a little over half the back. But thanks to the gathers in the front, the back actually fits pretty decently too.


The arm - holes were just right, and the fit is very comfortable. I also like to pretend that my waist feels flattered (no no, don't disillusion me). But the most fun is the wide boat neck. The next photo show's off the neck 
Photo


(The mania - like expression is not real. Shri demanded I 'keep my eyes open'. This is what happened!)


The next time, I'm going to add some width to the front piece, and let the extra material form a slight cowl at the neck. It'll feel more comfy; and may even look more classy!
This one's pretty decent for a simple day out though. I wore it out just yesterday, and it was comfortable, and with the right jewelry, looked quite stylish, I thought. :)


Thursday, 13 June 2013

Lets Craft Small-er (Jeans)

Jeans. One of the most comfortable pieces of clothing. You can buy 'em and wear 'em right out of the shop - unless you are petite, curvy and not really in shape, like me. Then there's always something that needs to be fixed. So when it was time to buy a new pair, I was not all sunshine in spite of the promise of a shopping trip (still, was mostly sunshine). Once I found a lovely pair of light blue jeans, the positive effects of retail therapy kicked in. Yeh! Once the initial euphoria wore off, I realized that there was no wearing the pretty new pair of jeans till the length was altered (it had a good many extra inches in the leg). Also, while the waist fit me really well, I could do with a little more tailoring to ensure it stayed fitted when sitting down.

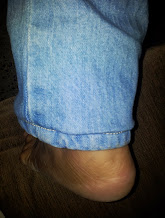
And then I found two tips that made my life all happy. The first came from here. This method requires one to fold the leg in, and stitch the original hem bit to the point which is one's required length. The flap of extra material can be either cut away, or hemmed up. I could definitely do that at home!! And so, I did. Because the original hem was retained, and none of my stitching was at all visible, all the detailing was just the same.

This is how much I needed to fold the jeans.....
Photo

This is how they looked when finished. This technique would work much better with a softer material, of course.
Photo

Now to make the waist fit.
This second tip was even simpler. This idea is genius, it is!! And I found it here. A tad bit of elastic, thread that blends in with the denim and the zig-zag setting on the sewing machine. I haven't done this, but I hope to try it on a low - waist pair of jeans soon.

All that's left to do is wear my newly shortened jeans and go meet some friends. :)